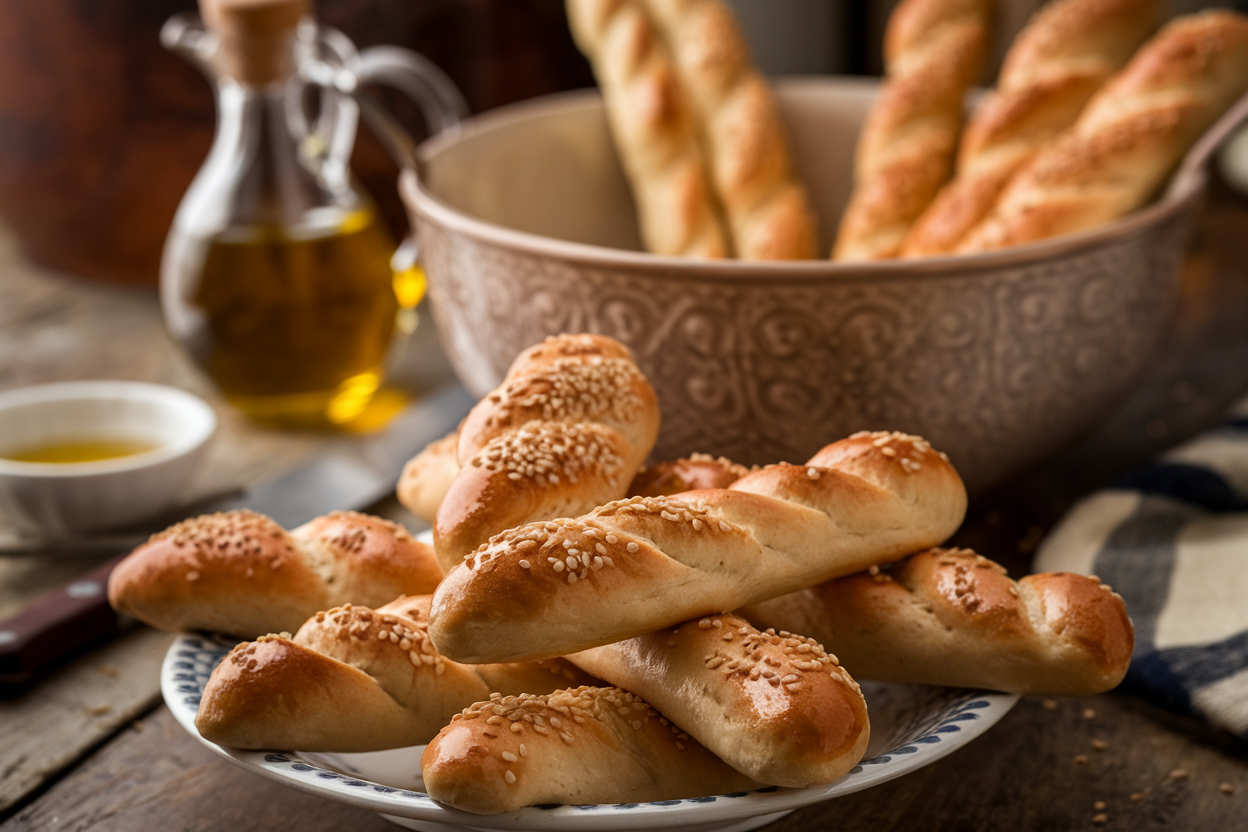
Unlock Super-Soft Olive Garden Breadsticks: The Steam Oven Secret
There's an undeniable magic to Olive Garden's famous breadsticks. That irresistible combination of pillowy softness, savory garlic butter, and a hint of salt has made them legendary. Many home bakers dream of recreating that restaurant experience, often searching for the perfect olive garden breadsticks copycat recipe. While achieving that ideal texture can feel elusive, we're here to reveal a secret weapon that elevates homemade versions from good to truly extraordinary: the power of steam.
Imagine warm, infinitely tender breadsticks emerging from your own oven, ready to be brushed with glistening garlic butter. We're not just aiming for a replication; we're aiming for an improvement. This guide will walk you through the essential techniques, clever tricks, and, most importantly, the steam oven secret to creating breadsticks that are even better than the original – so soft, so flavorful, they're practically impossible to resist.
The Quest for the Perfect Olive Garden Breadsticks Copycat Recipe
Developing a truly exceptional olive garden breadsticks copycat recipe can be a fascinating challenge. The bar is set high when you're competing with a universally beloved restaurant staple. Many home bakers, even those who don't consider themselves expert bakers, yearn to replicate that unique texture and taste. The goal isn't just to make breadsticks, but to craft ones that possess that characteristic softness, pair beautifully with any meal, and reheat wonderfully – perhaps even becoming a regular request at your family table.
The journey to perfecting these breadsticks often involves trial and error, but the satisfaction of nailing that super-soft texture is immense. There’s a certain pride in serving homemade versions that consistently outperform their restaurant counterparts, offering a fresher taste and a more tender crumb. These aren't just breadsticks; they're a warm, comforting invitation to the dinner table, and once you master them, you'll find yourself reaching for one every time you pass by.
Unlocking Unmatched Softness: The Steam Oven Secret
The single most impactful technique for achieving incredibly soft breadsticks, akin to those from Olive Garden, lies in baking them in a moist, steamy environment. This isn't just a minor tweak; it's a game-changer that professional bakers often leverage, and it's surprisingly simple to implement in your home oven.
Why Steam Makes All the Difference
When dough bakes, its surface rapidly forms a crust. In a dry oven, this crust can set too quickly, restricting the dough's ability to expand and rise to its full potential. The result is often a denser, tougher interior. Introducing steam into the oven delays this crust formation. The moist air keeps the surface of the dough supple, allowing it to stretch and rise more effectively. This extended expansion time, combined with the continuous moisture absorption, leads to a significantly lighter, more open crumb and that coveted super-soft texture. It’s the closest you can get to a professional bakery's steam-injected oven without a major appliance upgrade.
How to Create a Steamy Environment at Home
- Preheat Thoroughly: Begin by preheating your oven to a robust 425˚F (220˚C). Ensure it's fully preheated, as consistent temperature is key.
- Prepare Your Steam Source: A few minutes before you're ready to bake your breadsticks, carefully pour about 3-4 cups of boiling hot water into a sturdy, oven-safe baking dish or cast-iron pan.
- Strategic Placement: Place this dish on the very bottom rack of your preheated oven. As the boiling water hits the hot dish, it will immediately begin to produce a cloud of steam, humidifying the oven cavity.
- Quick Transfer: Once the steam has built up (usually within 2-3 minutes), quickly and carefully transfer your shaped breadsticks to a baking sheet on a higher rack, then close the oven door to trap the steam.
This simple act of adding a water bath transforms your regular oven into a temporary steam oven, providing the ideal conditions for your olive garden breadsticks copycat recipe to achieve unparalleled softness and a wonderfully delicate crust.
Mastering the Dough: Essential Techniques for Your Olive Garden Breadsticks Copycat Recipe
While the steam oven is the secret weapon, a perfectly prepared dough is the foundation. Even if you're not an experienced baker, a few key techniques can make all the difference in achieving that ideal texture for your homemade breadsticks.
Precision is Key: Weighing Your Ingredients
One of the biggest frustrations for amateur bakers can be inconsistent results, and often, the culprit is inaccurate measurement. Seasoned bakers instinctively know this, but for the rest of us, it's a vital tip: use a kitchen scale to weigh your ingredients, especially flour. A "cup of flour" can vary wildly depending on how it's scooped and packed – it could be 4 ounces for one person and 5 ounces for another. That seemingly small difference can dramatically impact the hydration and texture of your dough, leading to a tough or crumbly breadstick. Weighing ingredients ensures precision and consistent results every single time, making your baking journey far less frustrating and much more rewarding.
Kneading for the Perfect Gluten Structure
This breadstick dough is remarkably forgiving, making it accessible for both stand mixer users and hand kneaders. Whether you use a dough hook attachment or your own elbow grease, the goal is to develop enough gluten to give the breadsticks their characteristic chew and structure.
- Stand Mixer: With a dough hook, let the mixer do the work for about 5-7 minutes on medium-low speed until the dough is smooth and elastic.
- By Hand: Expect to knead for about 10 minutes. It's a fantastic arm workout, and you'll feel the dough transform from shaggy to silky under your hands.
To confirm your dough is ready, perform the windowpane test. Pinch a small piece of dough between your fingers and gently stretch it. If you can stretch it thin enough for light to pass through without tearing, enough gluten has formed. This indicates the dough has the strength and elasticity needed to create those wonderfully airy and soft breadsticks. For more detailed guidance on achieving perfect dough texture and other expert tips, check out our guide on Master Olive Garden Breadsticks: Pro Tips for Perfect Texture & Garlic Butter.
The Art of Proofing
After kneading, your dough needs time to proof – to rise. Place it in a lightly greased bowl, cover it with plastic wrap to prevent a skin from forming, and let it rest in a warm spot until it has doubled in size. This typically takes about 60-90 minutes, but the exact time will depend on the ambient temperature of your kitchen. A warmer environment will accelerate proofing, while a cooler one will slow it down. Patience during this stage is crucial, as it allows the yeast to work its magic, creating air pockets that contribute to the breadsticks' signature lightness.
The Irresistible Finish: Garlic Butter & Beyond
No olive garden breadsticks copycat recipe would be complete without that iconic, aromatic garlic butter. It's the crowning glory that takes these breadsticks from delicious to absolutely divine. This simple, yet potent, finish is key to elevating your homemade breadsticks to restaurant-quality status and beyond.
The Magic of Melted Garlic Butter
The trick is to brush the breadsticks with the garlic butter immediately after they emerge from the hot oven. The heat of the breadsticks allows the butter to melt and soak right in, infusing every crevice with rich flavor and adding an extra layer of moisture. This isn't just about taste; it's about texture too. The butter contributes to that moist, tender mouthfeel we all crave. A basic garlic butter can be made by simply melting unsalted butter with minced garlic and a pinch of salt. For an extra kick, consider adding a dash of garlic powder, dried parsley, or a touch of oregano to your butter mixture.
Ingredient Spotlight: The Role of Quality
While the steam and technique are vital, the quality of your base ingredients also plays a role. Using whole milk, for instance, adds a richness and tenderness to the dough thanks to its higher fat content. This contributes to a softer crumb and more flavorful breadstick. Similarly, opting for unsalted butter for both the dough and the garlic topping gives you complete control over the salt levels, ensuring your breadsticks are perfectly seasoned to your preference. If you only have salted butter on hand, simply reduce or omit any additional salt called for in the dough recipe.
Planning Ahead & Reheating Your Homemade Breadsticks
One of the best advantages of making your own olive garden breadsticks copycat recipe is the ability to plan ahead and enjoy them whenever a craving strikes. These breadsticks are incredibly freezer-friendly, offering flexibility for busy schedules.
Make-Ahead Dough Option
If you love the idea of fresh-baked breadsticks but need to save time on baking day, you can prepare the dough in advance. After the first proof, you can freeze the dough. Simply wrap it tightly in plastic wrap and place it in a freezer-safe bag. When you're ready to bake, thaw the dough slowly in the refrigerator overnight. Once thawed, shape the breadsticks and proceed with the recipe as usual, allowing for a second proof before baking.
Freezing Baked Breadsticks
Already baked a batch and have leftovers? Or perhaps you want to make a large batch to have on hand? You can freeze fully baked breadsticks too! Allow them to cool completely after baking and buttering. Then, transfer them to a freezer-safe container or bag, where they'll keep for up to three months. To reheat, simply pop the frozen breadsticks directly into a preheated oven (around 350°F/175°C) for 5-10 minutes, or until warmed through and soft again. You can also quickly warm them in a microwave, though the oven provides a more consistent, tender result without becoming chewy.
For those times when you need these delicious breadsticks on the table in a flash, our guide to Quick & Easy Olive Garden Breadsticks: Make Them in Under an Hour offers fantastic shortcuts and speedy techniques that perfectly complement these make-ahead strategies.
Conclusion
Crafting your own super-soft Olive Garden-style breadsticks at home is a rewarding culinary adventure, made truly exceptional by the simple yet powerful technique of baking with steam. By embracing this "steam oven secret," along with precise ingredient measurement and proper dough handling, you can create an olive garden breadsticks copycat recipe that not only rivals the original but often surpasses it in freshness and tenderness. The rich garlic butter finish ties it all together, ensuring every bite is a delightful experience. So, preheat that oven, boil that water, and prepare to impress yourself and your loved ones with a basket of homemade breadsticks that are truly impossible to resist.
